UI 배치를 효과적으로 하기 위해
예시 코드
import 'package:flutter/material.dart';

void main(){
  runApp(containerbox());
}

class containerbox extends StatelessWidget {

  @override
  Widget build(BuildContext context){
    return MaterialApp(
      debugShowCheckedModeBanner: false,
      title: '컨테이너 박스',
      home: Scaffold(
        appBar:AppBar(
          title: Text('컨테이너 박스'),
        ),
      body: Container(
        decoration: BoxDecoration(
          color: Colors.red,
          borderRadius: BorderRadius.circular(12)
        ),
        width:500,
        height:200,
        padding: EdgeInsets.all(20),
        margin: EdgeInsets.all(50),
        child: Column(
          crossAxisAlignment: CrossAxisAlignment.center,
          children: <Widget>[
            Text('1행'),
            Row(
              mainAxisAlignment: MainAxisAlignment.end,
              children: <Widget>[
                Text('1열'),
                Text('2열'),
              ],
            ),
            Row(
              mainAxisAlignment: MainAxisAlignment.start,
              children: [
                ElevatedButton(
                  onPressed: (){print('3행 1열');},
                  child: Text('3행 1열')
                ),
                ElevatedButton(
                  onPressed: () {print('3행 2열');},
                  child: Text('3행 2열')
                ),
              ],
            ),
          ],
        ),
      ),
      ),
    );
  }
}
Container
하나의 자식이 들어갈 수 있는 공간을 만들어주는 Widget
width, height : 넓이와 높이를 지정하는 속성
margin, padding : 공간의 바깥 Widget과의 거리, 공간 안 Widget과 거리를 지정하는 속성
decoration : 공간을 꾸미는 속성
borderRadious : 공간의 테두리를 둥글게 만들어주는 decoration의 속성
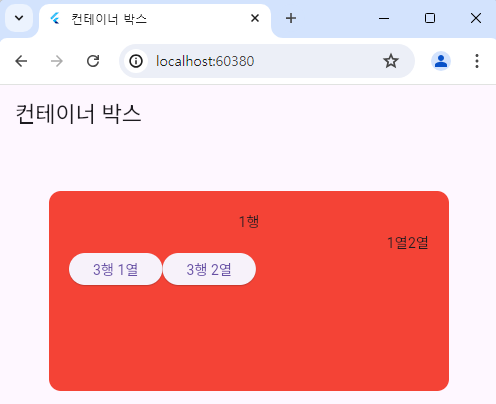
그리고 자식으로 Column(행)을 넣어줬다.
Column (행)
자식들이 생길 때 마다 한 행씩 배치된다.
Row (열)
자식들이 가로로 배치된다.
CrossAxisAlignment, MainAxisAlignment 정렬
Column과 Row에 있는 crossAxisAlignment와 mainAxisAlignment는 위젯의 정렬을 도와주는 속성이다.
start, center, end 속성을 사용하여 Widget들을 정렬한다.
mainAxisAlignment : Widget의 주축을 기준으로 정렬
Row는 가로, Column은 세로 방향으로 나열
crossAxisAlignment : Widget의 교차축을 기준으로 정렬
Row는 세로, Column은 가로 방향으로 나열
결과:

'Dart > Flutter' 카테고리의 다른 글
| Flutter로 앱 만들기 - 10. MaterialApp의 위젯 정리 (0) | 2024.06.22 |
|---|---|
| Flutter로 앱 만들기 - 9. Dart 비동기 (1) | 2024.06.21 |
| Flutter로 앱 만들기 - 8. Dart 클래스 (0) | 2024.06.20 |
| Flutter로 앱 만들기 - 7. Dart의 함수 (1) | 2024.06.20 |
| Flutter로 앱 만들기 - 6. Dart의 기본 문법 정리 (0) | 2024.06.20 |